How to Use Team Red Miner
- Download and install the TeamRedMiner application on all machines that will be used for mining in order to run mining on multiple devices.
- Unzip the archive (.zip) to a location on your computer that is convenient for you.
- Create or change a file with the.bat extension in the folder containing the miner. Any text editor (for example, Notepad or Notepad++) will suffice. When saving the file, make sure to select ‘All Files’ rather than ‘txt’ as the file type. Otherwise, you’ll wind up with.bat.txt at the end of the file name, which miner won’t be able to access. The following text (Step 2) should be in your bat file (let’s call it 1 Ehereum-binance pool.bat):
Attention! Windows may refuse to open the bat file for security reasons. You should allow it to open in the pop-up window in this scenario.
Enter the following command:
setx GPU_FORCE_64BIT_PTR 0
setx GPU_MAX_HEAP_SIZE 100
setx GPU_USE_SYNC_OBJECTS 1
setx GPU_MAX_ALLOC_PERCENT 100
setx GPU_SINGLE_ALLOC_PERCENT 100
teamredminer.exe -a ethash -o stratum+tcp://ethash.poolbinance.com:8888 -u username1.worker_name -p x
Configure the miner according to your preferences.
USERNAME – enter YOUR Ethereum wallet address or pool (this is how TeamRedMiner Miner knows where to deposit your ETH) RIG NAME – you can name it whatever you like (for example, test), but don’t go overboard: it should be no more than 32 characters long and contain only letters and numbers (no special characters like $ percent »*;@). In all files, make careful to replace the pool and wallet addresses with the ones you’re using.
Start mining
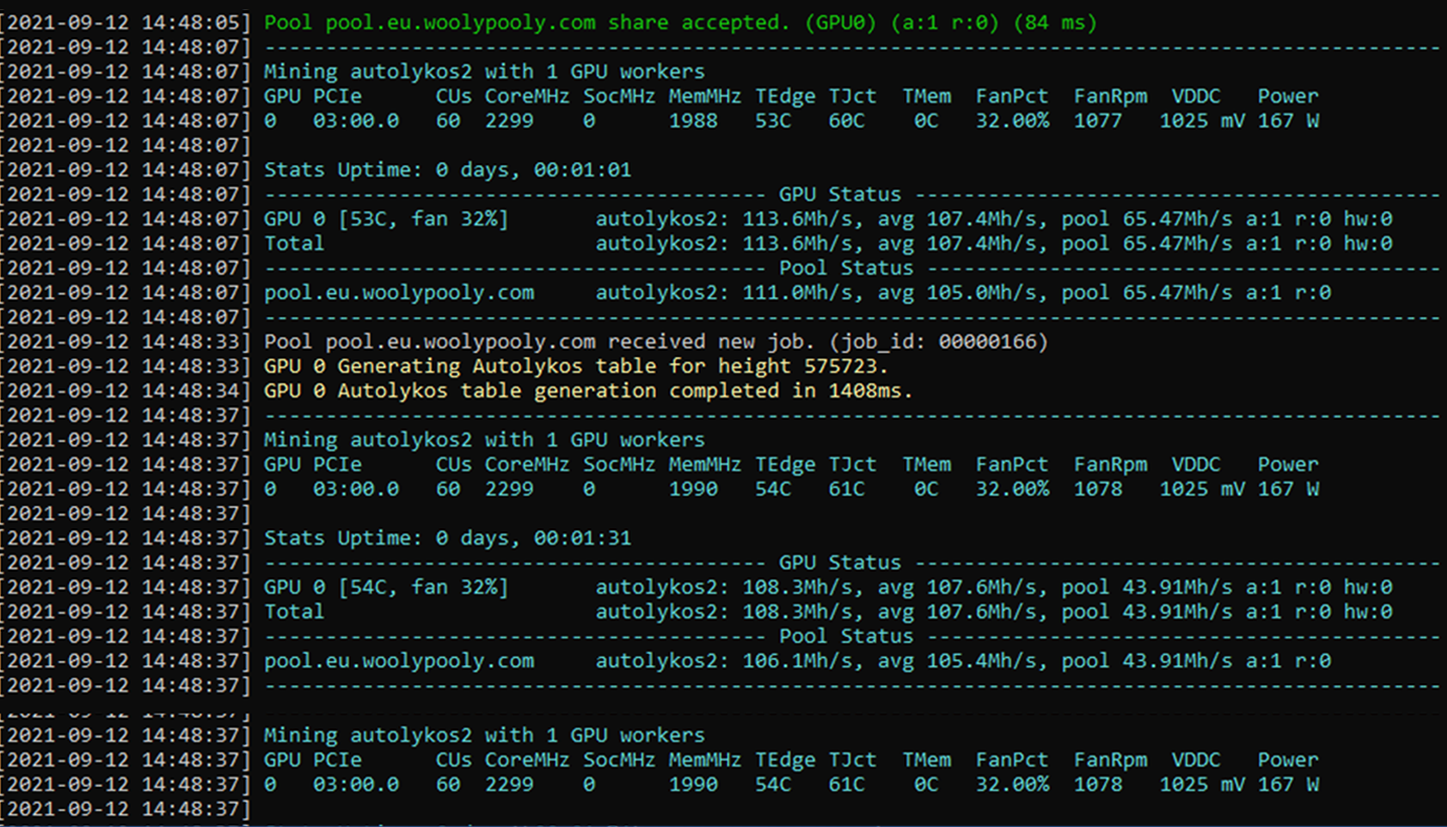
To start the miner, double-click the Bat file. The miner will boot up, perform the setx commands to set those environment variables, setup each of your GPUs, create the DAG file on each of your GPUs, and begin hashing. This screen should appear if you followed the procedures above.
Files
The TeamRedMiner download comes with a lot of different files/folders that usually change over time after new updates are implemented, but this guide will give you a good idea of what everything is like when you decide to download and use the miner.
First let’s start with all the help/documentation .txt files that include the following:
All these files are documentation for certain parts of TeamRedMiner, such as optimization for specific algorithms, and all the general information you need when it comes to configuring your GPU using their commands and memory timings, as well as for mining certain coins.
After the documentation, let’s look at all the start_bat files, which include the following:
- These files are ready-made templates that allow you to immediately start mining any coin from the list on page 1.
- All you have to do is edit the file to your wallet address, choose the name of the worker and the mining pool that best suits you.
- There are still some command files that do not have any functionality.
enable_compute enable calculation mode if you have Polaris GPUs (AMD RX 400/500 Series) running. You will know that you need to run this file if you get 7 MH, whereas it was supposed to get 25+ MHASH.
help just display a list of commands in a file usage.txt, which we will consider in the commands section.
list_devices will display all active GPUs connected to the current PC/installation.
I suggest avoiding run_autotune files and simply overclocking them using mining software or using command line arguments.
There’s not much to tell about the other two files, the file watchdog.bat is activated by a script -watchdog_script from command line arguments, which restarts the PC/Rig if it freezes during mining.
Now you have settled on TeamRedMiner.exe, an executable file for the miner that runs the files.bat . So you don’t need to run this executable manually.
How To Use TeamRedMiner | Step-by-step Tutorial
All arguments and command line options
Now let’s look at all the available commands of the program and the capabilities of the miner in more detail.
If there are two commands per line, then only one must be entered. The second is its synonym. Example: -o and [ --url=URL] are the same. Enter either -o or --url=.
Pool connection settings
-o, --url=URL Specify the url address of the pool. Both stratum+tcp and stratum+ssl addresses are supported.
-u, --user=USERNAME Specify the username for authorization on the pool or the wallet address (depending on the pool).
-p, --pass=PASSWORD Specify a password for authorization on the pool (not all pools use a password).
--rig_id Set the farm ID to be sent to the pool. This is only used for cryptonight pools.
--pool_connect_TO=SEC Set the timeout for attempting to connect to the pool. SEC is the timeout in seconds. The default is 10.
--pool_max_rejects=N If the pool rejects N shares in a row, the connection to the pool is dropped. This is to prevent the use of pools that invalidate mining sessions without disconnecting the user. The default value is 5.
--pool_strategy=STRAT Set pool selection strategy when working with multiple pools. The available values are priority, load_balance, and quota. The default is priority.
priority: the miner will use the pools in the order they are listed, only moving to the next pool if the previous one cannot establish a connection.
load_balance: The miner will evenly distribute the hashrate across all currently connected pools.
quota: the miner will evenly distribute the total number of hashes in all pools. If a pool disconnects and then reconnects, the miner will move the hashrate to the pool until the total number of hashes for each pool is balanced.
-a, --algo=ALGORITHM Choose an algorithm for mining. Currently supported:
ethash            (eth, etc, etp, others)
kawpow            (ravencoin)
lyra2z
phi2              (lux, argoneum)
lyra2rev3         (vtc)
x16r              (rvn original)
x16rv2            (rvn)
x16s              (pgn, xsh)
x16rt             (veil, gin)
mtp               (zcoin)
cuckatoo31_grin   (grin)
cuckarood29_grin  (grin)
cnv8
cnv8_half         (stellite, masari)
cnv8_dbl          (x-cash)
cnv8_rwz          (graft)
cnv8_trtl         (old turtlecoin, loki)
cnv8_upx2         (uplexa)
cn_heavy          (classic CN heavy)
cn_haven          (haven)
cn_saber          (bittube)
cn_conceal        (conceal)
trtl_chukwa       (turtlecoin)
Device management (select cards for mining)
If not specified, all devices will be used.
--platform=INDEXS pecify the OpenCL platform index to use. If not specified, the platform will be detected automatically. Multi-platform Linux is only supported without the –platform option, but the –bus_reorder command is used instead.
-d, --devices=DEVLIST Specify the GPU devices to use from the discovered list. The list must be a comma-separated list of device indexes, for example, -d 0,1,2,4. If not specified, all devices will be used.
NOTE for Linux: if –bus_reorder is used, the indexes after the reorder are used. Use –list_devices to show indexes.
--init_style=1/2/3 Specify initialization mode (1 by default): 1: One video card at a time, initialize all cards before mining. 2: three video cards at the same time, initialize all cards before mining. 3: all graphics cards at the same time, start mining immediately
--pcie_fmt=FORMAT Specify the output format for pci-e bus numbers. Valid values for FORMAT are “hex” or “dec”. The default is dec for windows and hex for linux.
--bus_reorder Reorder discovered or specified devices after they have been identified. If no platform is specified, devices will be built from all AMD OpenCL platforms discovered.
--list_devices List available devices for the detected or specified platform and exit immediately. The bus will be reordered in the specified order.
--allow_all_devices Some algorithms cannot be mined, such as those using a 4GB GPU. These video cards will be automatically disabled by the miner. This argument overrides this logic and allows mining on all specified or discovered devices.
--opencl_order Consider opencl cards according to the platform.
Intensity and tuning
--auto_tune=MODE Enable autotune mode at startup. Only available for CN algorithm variants.
MODE must be NONE, QUICK or SCAN.
- QUICK mode checks several known good configurations and completes within 1 minute.
- SCAN will check all possible combinations and will work for 20-30 minutes.
- Setting the mode to NONE disables the autotuning function.
- The default mode is QUICK.
--auto_tune_runs(=N) Perform several auto-tuning runs, decreasing the unit of threads used each time (15+15 -> 15+14 -> 14+14 -> 14+13 -> …). You can specify an explicit number of runs or let the miner choose a default value for each type of video card (usually 3-4).
--auto_tune_exit If auto-tuning is enabled, then the miner will close after the auto-tuning process is completed. This is useful when you want to find the optimal settings and then use the given command line argument found by the miner.
--allow_large_alloc If “large_alloc” is enabled and the driver indicates that enough graphics card memory is available, then the miner will work more aggressively with the initial memory allocation.
In practice, this setting means that Vega cards under Linux will start the autotuning process at 16*15 rather than 16*14 or 15*15.
Temperatures
--no_gpu_monitor Disable using ADL (Windows) or sysfs (Linux) temperature monitoring for temperature and fan speed.
--temp_limit=TEMP Set the temperature at which the miner will stop too hot video cards. The default is 85C.
--temp_resume=TEMP Set the temperature below which the miner will resume the work of video cards that were previously stopped due to exceeding the temperature limit. The default is 60C.
Program interface
--disable_colors Disable color output of fonts in the miner console.
--force_colors Force a console color output even if the terminal does not support colors.
-l, --log_interval=SEC Specify the time interval in seconds for averaging and displaying hashrates of video cards. SEC sets the interval in seconds and must be > 0..
Error and debug log
--debug Enable error and debug log output.
--log_file=FILENAME Enable writing miner output to the file specified in FILENAME.
Stability
--watchdog_script(=X) Set up a watchdog timer to turn off the miner, run the specified file, and exit immediately. The default script is watchdog.bat / watchdog.sh in the current directory, but another script can be provided as an optional argument, it is also possible to specify an absolute or relative path.
--watchdog_test Test the configured watchdog script by calling the same action as the stopped video card after ~20 seconds of mining.
Other settings
--api_listen=IP:PORT Enable API. The IP port is optional. If present, then IP:PORT selects the interface(s) and port to listen on. The default is 127.0.0.1:4028. For external access use, for example, 0.0.0.0:4028. It is also acceptable to specify only the port, for example, 4029.
--no_cpu_check Disable the processor checking for found resources before sending them to the pool. Note: Currently only CN algorithms support CPU checking.
--no_lean Disable CN lean mode, which causes threads to slowly increase on startup or restart after network problems, or after slowing down after the graphics card overheats.
--no_interleave=DEVS Lists GPU devices where CN thread interleaving logic should not be used. The argument is a comma-separated list of devices, such as the -d option. Use this argument if some devices are getting worse hashrate along with more log messages.
--pool_broken_rpc Tell the miner to make only one outstanding rpc request to connect to the pool. This is a workaround for pools that violate the json rpc spec regarding rpc ids.
--pool_rpc_TO=SEC Set the time for how long the miner will wait for an RPC without a response on the pool. After this time, the miner will reconnect to the pool. SEC is the timeout in seconds. The default is 60.
--pool_no_ensub Prevent the miner from sending a request to subscribe an extranonce to the pool.
--no_ntime_roll Prevents miner lag when “ntime” is in the block header, ONLY using the value provided by the pool. This option must be enabled for some pools when mining coins of the x16rt algorithm.
--hash_order=VALUE Set a fixed hash order for algorithms like x16r for benchmarking. Note that this option requires a connection to the pool, but it will not submit solutions. The standard hash order for x16r is –hash_order=0123456789abcdef.
-h, --help Show help message and exit.
Example of Team Red Miner settings (bat file)
The miner is launched using the command line in the Linux operating system or a bat file in Windows. Below are examples of bat files for each of the cryptocurrencies that can be mined using Team Red Miner. Don’t forget to replace YOUR_ADDRESS with your wallet address, and RIG_ID with your company name. You can choose the name yourself absolutely arbitrarily, it should contain only the letters of the English alphabet and the signs “-” and “_”. The wallet must be specified by the cryptocurrency that you are mining.
Ethereum
teamredminer.exe -a ethash -o stratum+tcp://eth.2miners.com:2020 -u YOUR_WALLET_ADDRESS.RIG_ID -p x pause
Ergo
teamredminer.exe -a autolykos2 -o stratum+tcp://erg.2miners.com:8888 -u YOUR_WALLET_ADDRESS.RIG_ID -p x pause
MOAC
teamredminer.exe -a ethash -o stratum+tcp://s1.solopool.org:8007 -u YOUR_WALLET_ADDRESS.RIG_ID -p x pause
Metaverse ETP
teamredminer.exe -a ethash -o stratum+tcp://etp.2miners.com:9292 -u YOUR_WALLET_ADDRESS.RIG_ID -p x pause
Callisto Network
teamredminer.exe -a ethash -o stratum+tcp://clo.2miners.com:3030 -u YOUR_WALLET_ADDRESS.RIG_ID -p x pause
Expanse
teamredminer.exe -a ethash -o stratum+tcp://exp.2miners.com:3030 -u YOUR_WALLET_ADDRESS.RIG_ID -p x pause
Ethereum Classic
teamredminer.exe -a ethash -o stratum+tcp://etc.2miners.com:1010 -u YOUR_WALLET_ADDRESS.RIG_ID -p x pause
Firo (Zcoin)
teamredminer.exe -a firopow -o stratum+tcp://firo.2miners.com:8181 -u YOUR_WALLET_ADDRESS.RIG_ID -p x pause
Ravencoin
teamredminer.exe -a kawpow -o stratum+tcp://rvn.2miners.com:6060 -u YOUR_WALLET_ADDRESS.RIG_ID -p x pause
MimbleWimbleCoin
teamredminer.exe -a cuckatoo31_grin -o stratum+tcp://mwc.2miners.com:1111 -u YOUR_LOGIN.RIG_ID -p x pause